Dear Readers,
Few days ago I got an e mail of my friend, he was going to send his photographs to me for publication but was anxious about the safety of his photographs from being taken and used without permission. I suggested him to watermark his photograph for protection. He requested me to give me guidelines about “How to watermark in Photoshop”. I guided him and the same is being published here for you. There are many ways to watermark the photograph, but this one is easier. This Photoshop tutorial will also give you some idea about Type Tool, Emboss filter & Layer blending mode. But do you know how to type the © Symbol ? This you will also learn in this tutorial. As usual your comments, suggestion and guidelines are always welcome. If you like you can send your tutorial or articles too for publication in this blog, after all this is your own blog……….Rajendra
One issue that concerns an increasing number of photographers is the possibility of image theft. With more and more photographers having their own web sites and displaying their work in online galleries this is an increasing problem. The trouble is we all know just how easy it is to copy and download the information and images that you can see online. In fact it couldn't be simpler. Right click, save picture and it's gone.
There is some good news. Online pictures need to be at a resolution of around 72 dots per inch. Much higher than this and you have issues with the amount of time it takes to download an image from a web server for a visitor to view it. Therefore your pictures are highly unlikely to be stolen from your website to be used in a magazine. The quality would fall a long way short of being acceptable. So is there anything that can be done to protect your online images? The answer is yes. Just stamp each image with your identification. The obvious advantage is that it is abundantly clear who owns the photograph. The downside is that it detracts a little from the image. In some cases it may also be possible to crop of clone the image and remove the copyright notice altogether.
To get started open an image that you want watermarked. I'll be using the image you see in below, if you like you may use the image below for practice –just right click and copy (but please don’t use it otherwise (just joking) :-

With your image opened in Photoshop, it's time to get started........

Click on the "Default Foreground and Background colors" icon to set the default black foreground and white background colors. The icon is near the bottom of the Toolbar, just below the foreground and background color swatches
TIP: You can use the keyboard shortcut to quickly set the default colors. To do so, simply hit the 'D' key
Select the Horizontal Type tool and set the Font Family, the Font Style and the Font Size. I used Times New Roman to Bold Italic 48 points for this example, but you can, and should play around to see what fits in best with the image(s) and the idea(s) that you're working on.  Click anywhere inside your image and type in the text you want displayed as a watermark. I'll type in “copyright © Rajendra” for this image. You can get the copyright symbol by using ALT 0169 (that is, I held down the ALT key and typed 0169 on the number pad of my keyboard).
 Click anywhere inside your image and type in the text you want displayed as a watermark. I'll type in “copyright © Rajendra” for this image. You can get the copyright symbol by using ALT 0169 (that is, I held down the ALT key and typed 0169 on the number pad of my keyboard).
Now Choose Filter, Stylize, Emboss.

You'll get a warning about the type layer needing to be "rasterized" before you can proceed. Rasterizing the type layer means that it can no longer be edited. No matter, if need be, you can simply re-create the type layer. Click "OK" to proceed. As you can see in figure the Emboss effect leaves the text looking raised. It has also changed the type to a mid-gray color with light and darker edges giving the effect of embossing.
Now choose a layer-blending mode that will make the new text visible but not as though we had simply typed on the image. Instead what will happen is that the gray will disappear letting the image 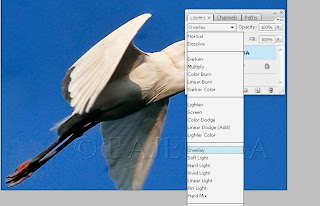 show through, but the lighter and darker edges will remain leaving a visible watermark on the image. To see what I mean, change the layer-blending mode to 'Overlay'. You can change the layer-blending mode from within the Layer palette. The pulldown menu to do so is located in the upper left corner of the Layers palette.
 show through, but the lighter and darker edges will remain leaving a visible watermark on the image. To see what I mean, change the layer-blending mode to 'Overlay'. You can change the layer-blending mode from within the Layer palette. The pulldown menu to do so is located in the upper left corner of the Layers palette.
 Below you can see my finished image. Notice that, though subtle, the watermark is visible and even readable.


No comments:
Post a Comment