If you have Adobe Photoshop installed, you can open and edit camera raw files from Bridge and save them in a Photoshop-compatible format. You can edit the image settings directly in the Camera Raw dialog box without starting Photoshop. If you don’t have Photoshop installed, you can still preview the camera raw files in Bridge
To start and quit Bridge, and to return to an application
Do any of the following:
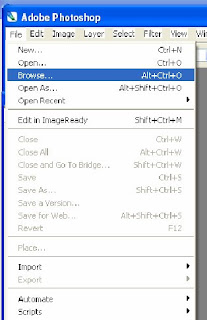
To open Bridge from an application, choose File > Browse from your application.
(Windows) To open Bridge directly, choose Adobe Bridge from the Start menu.
 (Mac OS)
 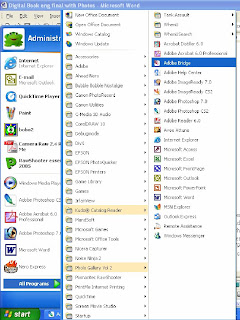 To open Bridge directly, double-click the Adobe Bridge icon . By default, this is located in the Applications/Adobe Bridge folder.
To quit Bridge, choose File > Exit (Windows) or Bridge > Quit Bridge (Mac OS).
To return to the last open application that started Bridge, choose File > Return To [Application].
To start and quit Bridge, and to return to an application
Do any of the following:
To open Bridge from an application, choose File > Browse from your application.
(Windows) To open Bridge directly, choose Adobe Bridge from the Start menu.
 (Mac OS)
  To open Bridge directly, double-click the Adobe Bridge icon . By default, this is located in the Applications/Adobe Bridge folder.
To quit Bridge, choose File > Exit (Windows) or Bridge > Quit Bridge (Mac OS).
To return to the last open application that started Bridge, choose File > Return To [Application].
How To view file and folder thumbnails in Bridge?
The content area of Bridge displays thumbnails of the files and folders of the selected folder, along with information about them (depending on your view).
You can specify how you want files and folders are displayed in the content area; for instance, you can decide how big thumbnails should be, how they should appear, and whether file information should be displayed.
Do any of the following:
Drag the Thumbnail slider at the bottom of the Bridge window to adjust the size of thumbnails. You can also click the buttons at either side of the Thumbnail slider to minimize or maximize the thumbnails.
Click the Thumbnail View button at the bottom of the Bridge window or choose View > As Thumbnails to display items in a grid.
Click the Filmstrip View button or choose View > As Filmstrip to display thumbnails in a scrolling list along with an extra-large thumbnail of the currently selected item. Click the Back button or Forward button directly below the extra-large thumbnail to go to the previous or next thumbnail. Click the Switch Filmstrip Orientation button to change from a horizontal slide show to a vertical one. Note that you can page through a PDF preview in Filmstrip view.
Click the Details View button or choose View > As Details to display a scrollable list of thumbnails along with information about the selected file, such as its creation date, file type, pixel size, and file size. For Version Cue files, there is additional information about the number of versions or alternates as well as enhanced status information along with the current version comment.
Click the Versions And Alternates View button or choose View > As Versions And Alternates to display a scrollable list of thumbnails along with thumbnails of any Version Cue alternates and versions for each item. (Only the current file appears unless you have created an alternates group containing the file or created previous versions of the file.) Click Alternates View or Versions View at the top right of the content area to display thumbnails of alternates or versions. In Alternates View, you can also create alternates groups containing files that are not in the current folder.
Choose View > Show Thumbnail Only to view thumbnails without any text information listed. However, Version Cue tool tips still display Version Cue information when you position the pointer over the thumbnail.
Choose View > Slideshow to view thumbnails as a slide show that takes over the entire screen. This is a quick and easy way to display and work with large versions of all the graphics files in a folder. Instructions on how to use the slide show are displayed on the screen when you choose this command.
Depending on the view you’re in, you can display extra file information by positioning the pointer over a thumbnail in the content area. For files in Version Cue projects, you can also choose File > Versions or File Alternate. This command opens a dialog box that lets you work with the file’s versions or alternates without having to select that view in the Bridge content area.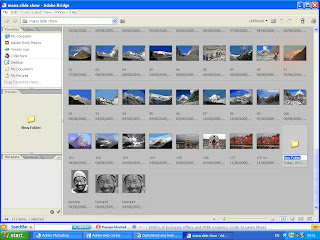


No comments:
Post a Comment