Friday, December 12, 2008

Adobe lightroom 2 FAQ


What is Adobe Photoshop Lightroom 2?
Adobe® Photoshop® Lightroom® 2 software is designed specifically for professional and advanced amateur photographers. It is an efficient, powerful way to import, process, manage, and showcase large volumes of digital photographs. Lightroom enables you to spend less time sorting and organizing images, so you have more time to actually shoot and perfect them.
Who uses Photoshop Lightroom 2?
First and foremost, Photoshop Lightroom 2 is a product for serious photographers, especially those who work with large volumes of digital images. These include fashion and portrait photographers; photojournalists; and wedding, landscape, and commercial photographers as well as passionate amateur photographers who aspire to achieve the same results as the pros and who demand the same level of quality in their tools. Lightroom is also used by educators and students, as the next generation of professional photographers hone their skills in the classroom.
What's new in Photoshop Lightroom 2?
Photoshop Lightroom 2 offers a host of enhancements to help manage, process, and showcase your photos more easily than ever before. Make more accurate enhancements by targeting a specific area of a photo for dodging and burning. Instantly find photos faster using the information most relevant to your workflow. Multiple monitor support enables you to configure your workspace to manage image workflow and presentation more efficiently. Work even more smoothly with Adobe Photoshop CS4 software (sold separately), switching with a single click to perform pixel-level editing. Quickly arrange a photo for printing multiple sizes on one or many pages with more flexible templates. And take advantage of third-party plug-ins to help you quickly and easily transfer images to popular photo-sharing sites.
What file formats does Photoshop Lightroom 2 support?
Photoshop Lightroom supports more than 190 native camera raw file formats, in addition to DNG, TIFF, and JPEG files — in other words, the formats primarily used in digital cameras. In addition, Photoshop Lightroom 2 also supports the Photoshop PSD file format for enhanced integration with Photoshop CS4. For a complete list of manufacturers and models supported in Camera Raw, see
www.adobe.com/products/photoshop/cameraraw.html.
Is Photoshop Lightroom 2 a photo-editing tool or a workflow productivity tool?
Photoshop Lightroom 2 provides a single environment that has all of the functions photographers most commonly need to perform on their images, in the cleanest, least cluttered, easiest to use package. Lightroom contains a focused set of features that are intuitive, powerful, and easy to learn. It is an image-editing tool and a workflow productivity tool. Photographers who require extensive painting and compositing tools and need to edit their images at the pixel level will still use Photoshop CS4 to achieve their additional goals.
How does Photoshop Lightroom 2 differ from Adobe Photoshop CS4?
Adobe Photoshop CS4 software is the industry standard in digital image editing. Photoshop holds an important place in the pro photographer's toolbox, for detailed pixel-level editing and compositing, but photographers face a variety of workflow concerns beyond image editing. Lightroom 2 addresses these needs in a photographer-centric way. Each module in Lightroom is dedicated to an essential photographic task — use the Library for importing and managing photos; the Develop module for fundamental photographic adjustments and processing hundreds of photographs at a time; and the Slideshow, Web, and Print modules to easily present photos onscreen, online, or in print. Lightroom also goes further, enabling you to manage raw files, even if they are offline, with automatic importing from the folder on your computer used for tethered shooting.
Lightroom excels at processing large volumes of photographs, creating the perfect negative, and outputting collections to the web, print, and slide shows. Photoshop remains the ultimate pixel-level, individual image-editing, and compositing application. Together, Lightroom and Photoshop are the comprehensive software duo for post-processing and editing of digital imagery.
For example, you may have 2,000 photographs and need to quickly preview, sort and rate them, embed your copyright on each, correct white balance, change tonal and color values, and make monochrome copies (or add a wide array of other special effects). Then, you need to output to a slide show, print, or the web, and all under the pressure of time constraints. For this common type of photographic workflow, Lightroom is the ideal solution.
Now perhaps some of your photographs are destined for an advertising layout. After choosing the best images, you may need to add a special effect to a model's eyes or change the pattern of a dress or pull the model completely away from her background to create an intricate, multilayered composite. For this, Photoshop is the ideal solution.
How does Lightroom 2 differ from Adobe Bridge?
Adobe Bridge is an essential image tool for web, print, and dynamic media designers; videographers; animators; scientists; fine artists; and numerous other industries around the globe. It is literally the bridge between the applications in Adobe Creative Suite®, enabling files to be quickly moved through varied workflows. Professionals use Adobe Bridge to browse files and pass them through many applications — from Photoshop and Illustrator® to InDesign® and Acrobat®, or to Flash® and Dreamweaver® or After Effects® and Adobe Premiere® Pro.
Because Adobe Bridge plays such a vital role for many different professions, it includes several features that are not specifically targeted at photographers. This complexity may be essential for the designer or post-production artist, but for photographers, Lightroom cuts to the core, without compromising power, flexibility, or quality. Because it has been created with the input of working photographers (including commercial, portrait, wedding, and fine art photographers; photojournalists; and others), Lightroom targets the most important and time-critical tasks to make them as efficient as possible.
One of the fundamental differences between Adobe Bridge and Lightroom is the way each application stores information about images. Adobe Bridge is a file browser, which navigates folders on a local drive and displays the contents. Photographers, however, often need to reference files stored on removable media such as a DVD or remote hard drive. While Adobe Bridge is incapable of displaying these offline files, Lightroom takes an extended view beyond the local disk — it can work with offline files because it is catalog-driven. Importing photographs to Lightroom is the method by which new images are added to its catalog. Photographic files do not need to be moved or copied when they are imported — the Lightroom catalog keeps track of where the originals are located, whether they are on your local hard drive or not.
The Lightroom catalog model also speeds the access to information, creating lightning-fast searches based on standard EXIF and IPTC metadata or simple keywords. And just as your photographs don't need to be stored on your local hard drive, neither does your Lightroom data. Multiple catalogs can be created, whether they are for individual clients and projects, or for students and their corresponding assignments, and they can be located on a local or removable drive for portability and security. Finally, the Lightroom catalog keeps track of information such as virtual copies; collections of images; editing history and snapshots; and slide show, print, and web templates — information that would be difficult to efficiently store otherwise.
Does Photoshop Lightroom 2 replace Adobe Bridge or Camera Raw?
For some, it might. Having an interface that is 100% tuned to the photography workflow and some additional unique features may mean some people will use Lightroom instead of Bridge. On the other hand, some photographers will need or want the broad capabilities of Adobe Bridge — such as integration with Adobe Creative Suite 4; the ability to preview PDF, InDesign, and Illustrator documents; and workgroup management tools. So many users will continue to use Adobe Bridge as well.
How does Lightroom 2 work with Adobe Camera Raw?
If you work with photographs in Photoshop CS4 or Adobe Bridge, you use Camera Raw to achieve the same kinds of editing as you would in Lightroom. In fact, Lightroom uses the same underlying processing engine as Camera Raw, which delivers consistent and compatible results across Adobe applications. Adobe understands that individual photographers work in many different ways. We are committed to providing customers not only with the choice of which software to use, but also with the ability to use multiple applications together as needed.
Where the Camera Raw implementation in Adobe Bridge or Photoshop has the same functions as Lightroom, you will find virtually identical options and sliders. That means you can move back and forth without confusion or the need for extra learning. Where Lightroom contains additional enhancements to raw processing, the enhancements you make will be recognized when the photo file is opened in Camera Raw. A typical example is the Targeted Adjustment tool that is exclusive to Lightroom.
Are there special requirements to make sure editing in Lightroom 2 is recognized by Camera Raw in Photoshop and Adobe Bridge?
Lightroom and Photoshop Camera Raw share the same image processing technology to ensure consistent and compatible results across applications that support raw processing. These applications include Photoshop CS4, Photoshop Elements 6.0 for Mac, Photoshop Elements 6.0, and Premiere Elements 4.0 for Windows®.
Photoshop Camera Raw 5Adobe applications must be updated with the Camera Raw 5 plug-in to ensure compatibility with Lightroom 2 Develop module settings. Photoshop CS4 users can update the Camera Raw plug-in automatically using the Update tool listed under the Help menu. The Camera Raw 5 plug-in can also be downloaded and installed manually by visiting the
Camera Raw file support page. Follow the installation instructions carefully.
Sharing Lightroom settings with Camera Raw 5By default, Lightroom's Develop module settings are stored in the Lightroom catalog. To ensure that Lightroom develop settings can be viewed by Camera Raw 5, the settings must be written to the XMP metadata block for that file. This metadata is stored in an XMP sidecar file (Imagename.xmp) in the current image directory of proprietary raw files or stored directly within DNG files. To update images with the latest Develop settings, choose the Library module and select the group of target images. Choose the shortcut Command (Ctrl + S) to save the settings to the XMP metadata block.
Sidecar XMP files are only required when moving photo files back and forth between Lightroom and Adobe Bridge or Photoshop CS4 for use in Camera Raw. If you prefer, you can simply wait until the files need to be moved to Bridge or Photoshop, and only then select the photos in the Library module in Lightroom, and then choose Metadata > XMP > Export XMP Metadata To Files.
Viewing Lightroom settings in Camera Raw 5Before working in conjunction with Lightroom and Camera Raw, please set the Camera Raw preference to save image settings in sidecar XMP files. By default, Camera Raw will display the image adjustments exactly as performed in the Lightroom Develop module.
Will my raw images look the same in Adobe Camera Raw and Photoshop Lightroom 2?
Yes. Photoshop Lightroom 2 leverages the same core Adobe Camera Raw technology used in Photoshop CS4. This means that not only will raw images look the same in either application, but also that changes you make in Lightroom can appear in Camera Raw and vice versa. To complete this interactivity, changes in both Camera Raw and Lightroom need to be written to XMP metadata. This is so that each software application can recognize the other's edits. This functionality is set in the preferences in each product.
Will Lightroom 2 recognize adjustments to photos made in earlier versions of Adobe Camera Raw?
Raw files edited by previous versions of Camera Raw will maintain their previous appearance when imported to Lightroom. For Lightroom to respect the previous edit, those files must have been edited with the preference set to save image settings in sidecar XMP files. Files edited in Camera Raw after being imported to Lightroom can be updated in Lightroom by choosing Metadata > Read Metadata From Files. Note that this menu option is only available from the Library.
How are the different versions of my photographs stored when I edit them with Photoshop Lightroom 2?
Photoshop Lightroom 2 is a completely nondestructive editing environment because, in fact, your photographs are never changed. Instead, the changes you make to your photographs are stored in metadata as a series of instructions. Whether you are viewing them onscreen, creating a web gallery, or making prints, Lightroom is simply applying those instructions to the original, untouched photo file. This enables the photographer complete flexibility, control, and creative exploration, with the knowledge that any change applied to an image is 100% reversible at any time — today, tomorrow, or years in the future.
Are the features the same in the Windows and Mac OS versions?
Yes. Photoshop Lightroom 2 contains the same features and delivers the same professional, best-of-class results, no matter which platform you choose to use.

Does Photoshop Lightroom 2 run on Windows Vista?
Yes. Photoshop Lightroom 2 is designed to run on both Windows XP and Windows Vista®.
How to open a file in Photoshop

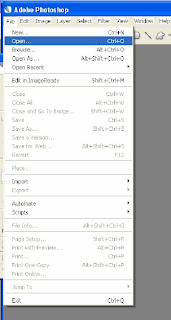
You can open files using the Open command and Open Recent command in the File menu.. In Photoshop, you can also open files using Adobe Bridge.
Sometim
es Photoshop may not be able to determine the correct format for a file. This can happen, for example, because the file has been transferred between two operating systems. Sometimes a transfer between Mac OS and Windows can cause the file format to be mislabeled. In such cases, you must specify the correct format in which to open the file.

Note: Photoshop and ImageReady use plug in modules to open and import many file formats. If a file format does not appear in the Open dialog box or in the File > Import submenu, you may need to install the format’s plug in module.
To open camera raw images in Photoshop
You can open one or more camera raw image files directly in Photoshop without opening the Camera Raw dialog box. Photoshop apples either the default camera raw image settings or your adjusted settings.
In Bridge, do one of the following:
Select one or more camera raw image files, hold down the Shift key, and choose
File > Open.
Hold down the Shift key and double-click a camera raw image file
.

Thursday, December 11, 2008

How to use Adobe Bridge

If you have Adobe Photoshop installed, you can open and edit camera raw files from Bridge and save them in a Photoshop-compatible format. You can edit the image settings directly in the Camera Raw dialog box without starting Photoshop. If you don’t have Photoshop installed, you can still preview the camera raw files in Bridge
To start and quit Bridge, and to return to an application
Do any of the following:
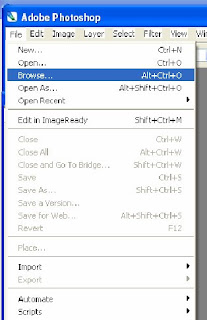
To open Bridge from an application, choose File > Browse from your application.
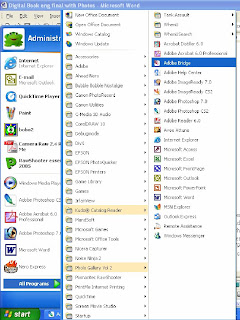
(Windows) To open Bridge directly, choose Adobe Bridge from the Start menu.
(Mac OS) To open Bridge directly, double-click the Adobe Bridge icon . By default, this is located in the Applications/Adobe Bridge folder.
To quit Bridge, choose File > Exit (Windows) or Bridge > Quit Bridge (Mac OS).
To return to the last open application that started Bridge, choose File > Return To [Application].

How To view file and folder thumbnails in Bridge?
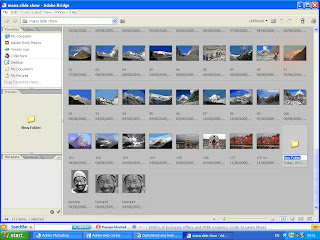
The content area of Bridge display
s thumbnails of the files and folders of the selected folder, along with information about them (depending on your view).
You can specify how you want files and folders are displayed in the content area; for instance, you can decide how big thumbnails should be, how they should appear, and whether file information should be displayed.
Do any of the following:
Drag the Thumbnail slider at the bottom of the Bridge window to adjust the size of thumbnails. You can also click the buttons at either side of the Thumbnail slider to minimize or maximize the thumbnails.
Click the Thumbnail View button at the bottom of the Bridge window or choose View > As Thumbnails to display items in a grid.
Click the Filmstrip View button or choose View > As Filmstrip to display thumbnails in a scrolling list along with an extra-large thumbnail of the currently selected item. Click the Back button or Forward button directly below the extra-large thumbnail to go to the previous or next thumbnail. Click the Switch Filmstrip Orientation button to change from a horizontal slide show to a vertical one. Note that you can page through a PDF preview in Filmstrip view.
Click the Details View button or choose View > As Details to display a scrollable list of thumbnails along with information about the selected file, such as its creation date, file type, pixel size, and file size. For Version Cue files, there is additional information about the number of versions or alternates as well as enhanced status information along with the current version comment.
Click the Versions And Alternates View button or choose View > As Versions And Alternates to display a scrollable list of thumbnails along with thumbnails of any Version Cue alternates and versions for each item. (Only the current file appears unless you have created an alternates group containing the file or created previous versions of the file.) Click Alternates View or Versions View at the top right of the content area to display thumbnails of alternates or versions. In Alternates View, you can also create alternates groups containing files that are not in the current folder.
Choose View > Show Thumbnail Only to view thumbnails without any text information listed. However, Version Cue tool tips still display Version Cue information when you position the pointer over the thumbnail.
Choose View > Slideshow to view thumbnails as a slide show that takes over the entire screen. This is a quick and easy way to display and work with large versions of all the graphics files in a folder. Instructions on how to use the slide show are displayed on the screen when you choose this command.
Depending on the view you’re in, you can display extra file information by positioning the pointer over a thumbnail in the content area. For files in Version Cue projects, you can also choose File > Versions or File Alternate. This command opens a dialog box that lets you work with the file’s versions or alternates without having to select that view in the Bridge content area.

Tuesday, December 9, 2008

Photoshop For Photographers

In a traditional darkroom, you control images with choices of films, chemicals, papers and processes. In the digital equivalent of the darkroom, you do so with a computer system and a photo-editing program. Just as in a traditional darkroom, the quality of your digital tools has an impact on the quality of your images.
However, a digital darkroom isn't like a traditional darkroom. For one thing, the lights are on. For another there is no prep time, so you can work only as long as you want. Costs are also lower because you can experiment and try things without wasting time and materials. If you make any really serious mistakes, you can always use the undo command.
Digital images can be edited in a wide variety of ways using photo-editing software. In some cases an editing program is used to "improve" an image by eliminating or reducing its flaws. In other cases it is used to take an image to a new place, making it something it never was.
The term computer graphics refers particularly to images displayed on a video display screen or Monitor. A computer-graphics system basically consists of a computer to store and manipulate images, a display screen (Monitor), various input and output devices, and a graphics software package—i.e., a program that enables a computer to process graphic images by means of mathematical language. These programs enable the computer to draw, colour, shade, and manipulate the images.
Graphics software programs enable a user to draw, colour, shade, and manipulate an image on a display screen with commands input by a keyboard. A picture can be drawn or redrawn onto the screen with the use of a mouse, a pressure-sensitive tablet, or a light pen. Preexisting images on paper can be scanned into the computer through the use of scanners, digitizers, or digital cameras. Frames of images on videotape can also be entered into a computer; Manipulated image can be printed on paper or on photographic film.
Pictures are stored and processed in a computer’s by either of two methods: Raster graphics and Vector graphics. Raster-type graphics maintain an image as a matrix of independently controlled dots or Pixels (picture Elements), while vector graphics maintain it as a collection of points, lines, and arcs. Raster graphics are now the dominant computer graphics technology.

ADOBE’S PHOTOSHOP
Adobe Photoshop is, without a doubt, one of the most exciting and versatile image creation and manipulation applications available. For anyone who deals with images -- from print media designers who come up with those dazzling ads in magazines, to Web creators sculpting awesome sites with cutting-edge graphics, Studio owners who want to restore damaged Photographs of their customers-- Photoshop is the tool of choice.
Basic Concepts
Photoshop is an extremely versatile tool: you can use it to correct errors in photos, to add effects to images, or to build complex images from scratch. Welcome to the basic concept section of Photoshop! Now we shall learn something very basic about work area, tools, menus & environment of Photoshop. Those who are familiar with Photoshop can skip this page. But if you are beginner, you better try this section to feel comfortable for further tutorials.
Adobe Photoshop Basics Outline
Before going for tutorials it is advisable to get familiar with the way Photoshop works. Photoshop is a raster program and an image processing package. This package deals lot with colors and selections. You must be well aware with the desktop of the package and the menus provided. Some Menus will come up with submenus and they provide more advance commands which requires proper practice to master. The tools and the potential of each tool of Photoshop have to be understood. After this get familiar with different types of Palettes, this explores endless way to creativity.
Desktop
It is essential to know about the environment we are working with when we study any package. When you open Photoshop 6.0 you we see some change if you are familiar with Photoshop 5.5. The work area is different. This is the tour of Photoshop 6.0 work area.Unless specified otherwise, Following lessons are applicable to Photoshop Version 5.0 and higher. When information in a lesson does not apply to all of these versions, notes will be provided for each version where applicable.
Navigating the Workspace of Photoshop
Let's get started by exploring the basic elements of the Photoshop workspace. There are four main counterparts to the Photoshop workspace

The Menu Bar
The Tools Option Bar
The Status Bar

The Toolbox
the Pallete

At the left side of your desktop you will find Toolbox. All the amazing tools you will be using throughout these tutorials are situated here.
Menu Bar
The top part is a menu bar where you will find general menus like File, Edit, Image, Layer, Select, Filter, View, Window and Help.
Tool Option Bar
Below menu bar, the newly introduced Tool Option Bar is placed. This When you are using any tool, the options related with that tool will be displayed on Tool Option Bar and can be directly accessed from there.
Palettes
Towards extreme right, you will find rectangular boxes called palettes. It can be dragged out from original box. Palettes have wide range from Navigator to Layers and Channels.
Status Bar
At the bottom of the desktop, like any package Photoshop also has status bar.

Menu Bar:

Menus With the revolution of graphic user interface every package is well equipped with menus so we don't have to remember the commands. There are some standard menus you will find in all the packages, like File, Edit etc. Some common sub menus are Cut, Copy, Paste selects all etc. Photoshop is an image-processing package hence it comes with its own menus used for image processing. We are giving brief description of the main menus used in photoshop.
File
You will find this menu in almost all the package. This consists of commands related with the general working of the package. In photoshop it consists of New, Open, Save, Save as, Place, Print, exit etc.
Edit
This is another standard menu of any software generally contains commands related with Cut, Copy, Paste, Clear. Photoshop provides more specific commands like Fill, Stroke, Color Settings, Preferences etc. along with general commands.
Image
Layers are photoshop specialty .You can use up to 100 layers depending upon the memory of your computer & size of your imageThis menu can be called as a backbone of photoshop if you consider it only image processing package. Most of the advance commands are situated here. The ground level tasks like changing mode, resolutions can be done through image menu.
Layers
Photoshop specialties! This easy to use feature made photoshop a very powerful image processing tool. Layers can be considered as transparent sheet on which we can process different parts of image. Layers can be edited separately and can be merged at the end.

Select
As we have already stated, selection is very important in any raster programs, select menu provides different ways of selections. Interestingly you can even save the selection for later use using save selection command. The range of the selection can be change with this menu.
Filter
Most interesting part for the photographers is Filter menu of Photoshop. They can Produce oil colour ,Soft Focus or Solarisation effect .As you proceed further this part becomes more serious. Most of the effects are carried out in the photoshop using standard filters provided by the package. You can use third party filters also.
View
This menu is used for easy and more efficient working. Different views help you to have better idea of your artwork. Besides, view menu provides some toggles between rulers, grids etc.
Windows
Mostly used for toggle purpose. I.e. for on and off of palettes, status bar etc.
Help
Provides you help features of Photoshop. In addition to the menu bar, Photoshop often has context sensitive menus for accessing some of the most likely commands depending on which tool is selected and where you click. You access the context sensitive menu by right clicking in Windows, or pressing the Control key on a Macintosh.
The Status Bar
Let's continue our exploration of the Photoshop workspace. There are four main counterparts to the Photoshop workspace: the Menu bar, the Status bar, the Toolbox, and the Palettes. We looked at the menu bars in the first section. In this lesson we’ll be learning about the status bar.
The Status Bar
Now take a look at the status bar along the bottom edge of the Photoshop workspace. The status bar is often taken for granted or overlooked entirely, but it can be a valuable tool, which shows document size, brief description about the tool you are using and view in percentage of the image. You’ll need an open document before the status bar will display any information.
Next in the status bar, you can see useful information about the tool you have selected. If you still have the zoom tool selected, your status bar should say "Zoom In" if you are outside of the document area. Move the cursor into the document area and you will see the status bar display instructions for using that tool.
The Toolbox
Let's continue our exploration of the Photoshop workspace. There are four main counterparts to the Photoshop workspace: the menu bar, the status bar, the toolbox, and the palettes. We've already covered the menu bar and the status bar. In this lesson we'll be learning about the toolbox. Since this is a general overview of the toolbox, the materials here are useful for any version of Photoshop.

When you look at the toolbox, notice how some of the buttons have a tiny arrow in the lower right corner. This arrow indicates that other tools are hidden under that tool. To access the other tools, click and hold down on a button and the other tools will pop out. Try this now by clicking on the rectangle marquee tool and changing to the elliptical marquee tool. The hidden marquee tools are shown here.
Now hold your cursor over one of the buttons and you should see a tool tip appear that tells you the name of the tool and its keyboard shortcut. All the marquee tools have a shortcut of M.

Photoshop Toolbar

Selection Tools
When you work with any raster based package, selection is always important factor as it is generally based on pixels. In vector programs we have the habit of click and select hence shifting from vector to raster makes little uneasy in the beginning for many beginners when it comes to selection. But with some practice it becomes not only easy but a very interesting activity. Selection Tools always work with closed border.
Powerful & user-friendly selection tools evaluate any Photo editing programme.

Rectangular Marquee Tool (M)
This is the first tool available in Photoshop for rectangular selection. Just drag it over the image and the rectangular part of the image will get marked with dotted line. This part is considered as Selected.

Elliptical Marquee Tool (M)
This is similar to previous tool. It selects elliptical area.

Lasso Tool (L)
This is different type of selection which enables you to draw freehand border around the area of the image you desire and select it.

Polygonal Lasso Tool (L)
Similar to Lasso but it is straight edged tool. I.e. You get straight line border as selection between two clicks.

Magnetic Lasso Tool (L)
One more interesting feature of Photoshop. It snaps the strong edged of the image and create the border. If you are using contrast colors in the image, this selection is always advisable.

Magic Wand Tool (W)
It's a pixel based selection. You don't have to trace the outline of the image like Lasso or Marquee tools. Magic Wand lets you to select the area of similar color. Clicking on the Add To Selection icon allows you to make more than one selection (see above). To remove part of your selection click on the Subtract From Selection icon and using the lasso to draw the part you want to subtract from the selection.
Tip Use the zoom tool to magnify your image while you are making your selections. You may find it much easier to work this way.
Choosing Feather will soften the edges of the selection of the lasso tools. The value of the feather will depend on your image size but generally 2-3 pixels will be sufficient.

Move Tool (V)
It is used to move the selections basically. It is also used to move guides and Layers. If you select some object or the part of the image it can be moved only with the move tool. If you use just the same selection tool then only selection border will move.

Crop Tool (C)
Want to trim the part of the image? Want to remove undesired part? Here is a tool. Crop tool actually trims the desired part of the image.

Airbrush Tool (J)
Start painting! Air brush let you paint the image with soft edges. The type of brushes can be changed.

Paintbrush Tool (B)

It is similar to paint bush strokes. Again the brush type can be changed.

Pencil Tool (B)

It has the hard edge like pencil. It simply works like pencil.

Clone Stamp Tool (S)

Need to make duplicates? Replicas ? Want to add more fruits in the dish? Here is the tool. It exactly copies image or the desired part of image in the file.

Pattern Stamp Tool (S)

It paints the area with the pattern.History Brush Tool (Y) Back to past! This amazing tool paints the copy of the selected state or the snapshot in the file.

Art History Brush (Y)
This also copies the selected state or the snapshot but it adds more flavors with stylized strokes.
Eraser Tool (E)
Remember School days with rubber eraser! It erases the pixels.
Background Eraser Tool (E)

This tool lets you to erase background and creates transparency.

Magic Eraser Tool (E)
This magical tool erases similar pixels to transparency.
Gradient Tool (G)
Creates color blends of different types. Even rainbow!Paint Bucket Tool (G)Fills the color in the area containing similar color pixels.

Blur Tool (R)

As a name indicates, it blurs, hard edges in the image.

Sharpen Tool (R)

As a name indicates, it sharpens, soft edges in the image.

Smudge Tool (R)

Have you ever dragged your fingers through wet paint and made mess? As a name indicates, it smudges.

Dodge Tool (O)

It’s too dark! Make it light with this tool.

Burn Tool (O)

Its too light! Make it dark with this tool.

Sponge Tool (O)

Would you like to change color saturation? Here is the tool.

Type Tool (T)

Without text you won't be happy! Type the text over an image with type tool.

Pen Tool (P)

Draw path with pen tool.

Eyedropper Tool (I)
If you want to use the color from image itself use eyedropper to pick the color from image. In practical use the colour sampler can be used to sample a colour and then that colour used for the repair.
Hand Tool (H)

Moves the image as if you are moving it by your own hand within its window.

Zoom Tool (Z)

Want to check magnified view? Want to reduce the view? Use zoom tool.

Moving down in the toolbox, we come to the color swatches. This is where the foreground and background colors are displayed. The tiny arrow to the top right allows you to swap foreground and background colors. The tiny black and white swatch symbol to the lower left allows you to reset the colors to the default of black foreground and white background. Hold your cursor over those two areas to learn the keyboard shortcuts. To change a color, simply click on either the foreground or background color swatch and select a new color in the color picker. Experiment by changing the foreground and background colors and then resetting them back to defaults.
The next two buttons on the toolbox allow you to toggle between quick mask and selection mode. We'll learn more about this later in future lessons.
Below that you have a set of three buttons that allow you to change the appearance of the workspace. Hold your cursor over each button to see what it does. Notice the keyboard shortcut for all three is F. Hitting F repeatedly toggles between all three modes. Try it now.
Palettes
These are small rectangular power packed boxes initially situated at the right side on the desktop of Photoshop. You can decide, control and create many parameters with the help of palettes. The hide and show pallets can be found in window menu. In this section we are giving brief information of the palettes.
Layers

Here you will create layers. The transparent sheets which are used to edit different parts of the image. You can even use layers to make the changes in the image without affecting the original image. Layer palette comes up with many useful options e.g. Create, copy, delete layer. You can merge the layers as well. Layer mode is another feature to trigger your creativity. Besides this there are some advance options like group with previous etc. Layers give you the freedom to work the way you want.
Channels
They Store color information. Channels can be used to create complicated selections using quick mask mode. That's the way alpha channel works! Different type of effects can be achieved through channels.
Path

Basically used for drawing. The path can be converted into selections. You can also stroke path.
Action

This palette used to save the command and reuse then on the image to automate the task.

History

This acts as famous undo. You can go back to past and start again from the step you want.


Palette

used to edit the text you place in the file.ParagraphIt is used to format paragraph.
Color

Work with colors. Use different color models. This is used to create desired color. The palette provides color bar which can be used to select foreground as well as background colors.

Styles

This is used to apply layer style on the object. You can use predefined style or you can create your own style.
Swatches

It is used to select the color. You can make your own library by adding different colors.

Navigator

This palette is used to navigate the views of the image in photoshop. With the help of slider you can change the view the image.
Info

As a name indicates it displays the information. Suppose you move the pointer over an image it will provide you information about colors. The display of the information changes according to different tools.

Wednesday, December 3, 2008

FIP Convention 2008

Dear Readers,
I am going to FIP Convention 2008 as Faculty of advance Digital Photography , so this blog will not be updated till 08.12.2008. Sorry. I am giving below the detailes of FIP Convention you can meet me their.........................Rajendra


24th. FIP Convention 2008
(Dedicated to KR Sukhdeo Singh)
5th to 8th December, 2008 at Lucknow
Host: Lucknow Camera Club


For attending it contact:
Mr Anil Risal Singh
Mob-09415464566

Photoshop tutorial